On this page
Every guide I write ends in the same handful of questions. How much hardware do I actually need? What happens when one box dies? Are my backups real or just a feeling? Why can’t this container reach that one? A guide can walk you through a setup, but it can’t do arithmetic about your lab — so I built eleven small tools that can, and put them at peira.dev/tools.
They’re free, none of them ask who you are, and seven of the eleven keep working once the page has loaded — network unplugged, laptop in a cupboard, whatever.
They share one lab profile
This is the part I’m most pleased with, and it’s the thing that makes them a set rather than eleven unrelated pages.
Describe your lab once — tick your services in the sizing calculator, press Save to profile — and the other tools pick it up. The failure simulator opens with your nodes and workloads already modelled. The backup planner already knows what data you have. The power-loss playbook already knows what’s plugged in. When you’re done, Lab doc hands the whole thing back as a Markdown file for your own notes.
Nothing about that profile leaves your browser. There’s no account, no sync, no server that could leak it — which is also why it doesn’t follow you between devices. The Markdown export is the way to carry it somewhere else.
Plan the build
The first three are for the stage where you’re still spending money, or have just spent it and want to know what you bought.
The sizing calculator asks what you actually want to run and gives you a node, RAM and storage recommendation. The number it cares most about is RAM, because that’s the constraint that actually bites — vCPUs overcommit happily on a hypervisor, memory doesn’t. Tick the “survive one node failure” box and the shape of the answer changes: you get a minimum of three nodes, because a two-node cluster loses quorum the moment one dies, which rather defeats the point.
The node failure simulator is the follow-up question. You’ve got the hardware — now kill a node and see which workloads actually fit on the survivors. It places the critical ones first and tells you plainly which ones are stranded. I wrote about doing this maths by hand in capacity planning for node failure; this is that post as a worksheet.
The 3-2-1 backup planner takes the data you’d hate to lose and shows where the gaps are. The rule it checks — three copies, two devices, one offsite — is the one CISA recommends for exactly the reason it keeps getting repeated: it survives the failure modes that actually happen. The tool is blunt about snapshots. A snapshot on the same disk as the original is versioning, not a backup, and it says so.
The sizing calculator is the one to open first, because pressing Save to profile there fills in most of the others for you.
Fix what’s broken
The middle five are for the evening it stops working and you can’t tell which layer is lying to you.
The overlay network diagnostic is a decision tree I built out of a genuinely miserable afternoon. A container couldn’t reach a machine across a Tailscale subnet router while everything else could, and it turned out three separate layers had to be right — the route inside the guest, the ACL grant, and a firewall on the destination. Two of those fail silently: no log, no rejection, the connection just times out. The tool walks them in order so you stop guessing. There’s a longer write-up in the subnet router post.
The other four need a language model behind them, so you point them at one you already have:
- Log triage — paste the wall of output and get the one line that actually matters, plus which of the frightening-looking lines you can ignore. Most of what looks alarming in a boot log is routine.
- Compose review — not another YAML validator; your file already parses. This reads a Docker Compose stack for what will bite you on the next update, the next reboot, or the next dead disk.
- Explain before you run — paste that command from a forum reply and get a plain-English breakdown, a red/amber/green rating, and an honest answer about whether you can undo it.
- The troubleshooter — describe the symptom, get ranked causes and the commands to check them.
Those four need a model to do their job, and these pages are static files with no server of mine in the path. So they ask you which model to use, and then talk to it directly from your browser. Three options, all free of me: run one on claude.ai with the Claude account you already have and no key at all; paste a key for OpenAI, Anthropic, Google Gemini, DeepSeek, Groq or OpenRouter; or point them at a model on your own hardware.
Whichever you choose, the thinking is paid for by you and costs me nothing, which is why these can stay up free indefinitely — and nothing you type, and no key you paste, ever passes through this site. The other seven need nothing at all.
While building the compose reviewer I got a Docker fact wrong and had to go and check it properly, so here it is, since half the advice online is out of date: since Docker 23.0, docker system prune --volumes and docker volume prune remove only anonymous volumes, and “unused” means no container is attached at all — a stopped container still protects its volume. Named volumes need docker volume prune --all. The command that genuinely does delete named volumes is docker compose down -v, which removes the ones declared in that file’s volumes: section. That’s the one that eats a database. If you’re setting up your first stack, the compose starter post covers the safe habits.
Survive the bad day
The last three are the questions nobody asks until the answer is expensive.
What else breaks when this breaks?
Everyone knows what their services do. Far fewer people know what else stops when one of them dies. The blast radius mapper lets you map the dependencies, click something to kill it, and watch the cascade.
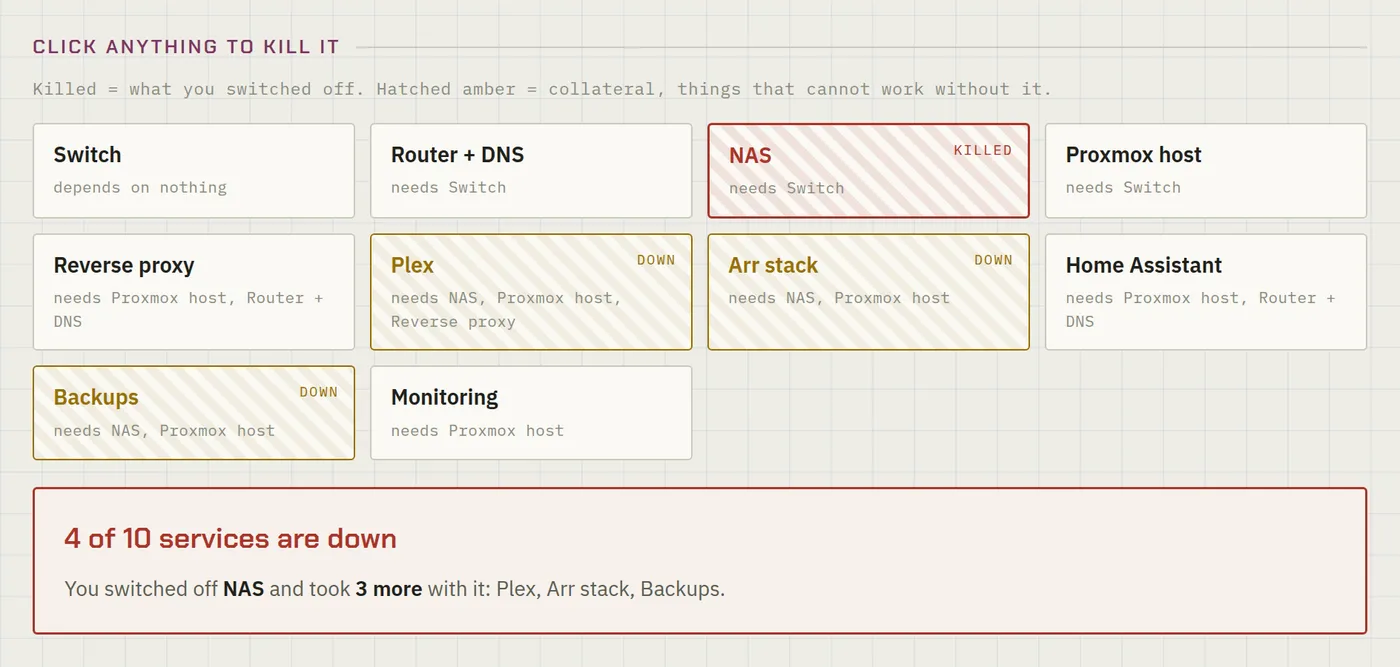
The ranking is the useful part. It’ll usually tell you that one unglamorous box — the switch, DNS, the host your containers actually run on — is carrying most of the lab. That isn’t automatically wrong; consolidation is what makes a homelab affordable. It just means your recovery plan for that one box is your recovery plan for everything.
Does your shutdown fit inside the battery?
Plenty of calculators will tell you how many minutes of UPS runtime you have. None of the ones I found tell you the thing that actually matters: what order to shut things down in, and whether that sequence fits in the time you’ve got.
The power-loss playbook works that out. It orders your machines into shutdown waves — workloads first, then compute, then storage, and the network last, because every remote shutdown command has to travel over it — then checks whether the whole sequence fits inside your battery, with the ride-out delay and an honest allowance for the fact that batteries fade with age.
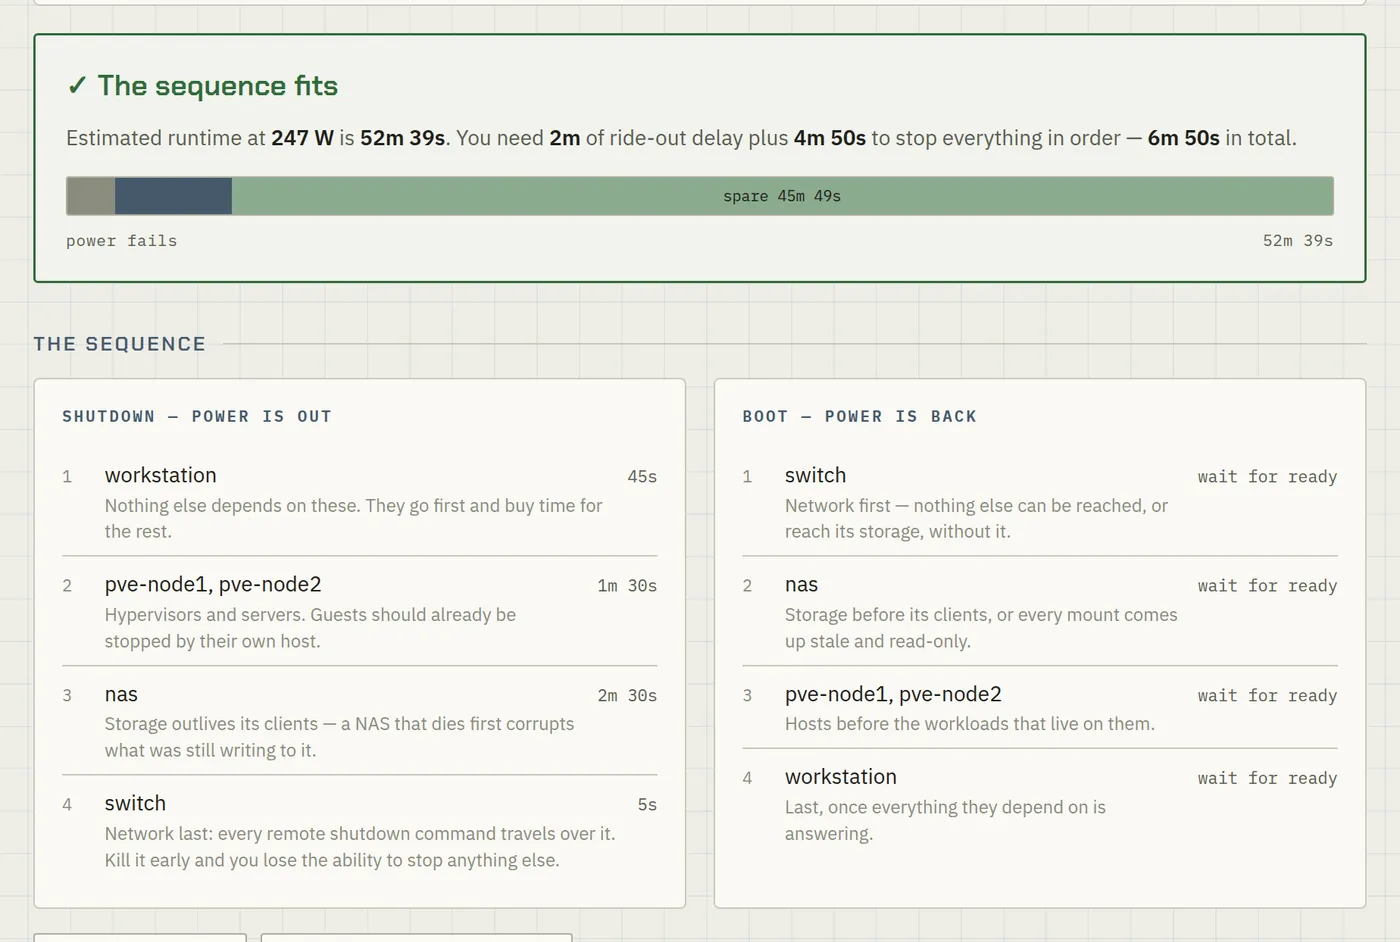
It’ll generate matching NUT settings too, though check them against your own hardware — driver support for the trigger values varies, and the only honest test is pulling the plug on purpose while you’re standing there. There’s a full walkthrough in the NUT safe-shutdown post.
Could anyone else get the photos back?
This is the one I nearly didn’t build, and it’s the one I’d most like people to use.
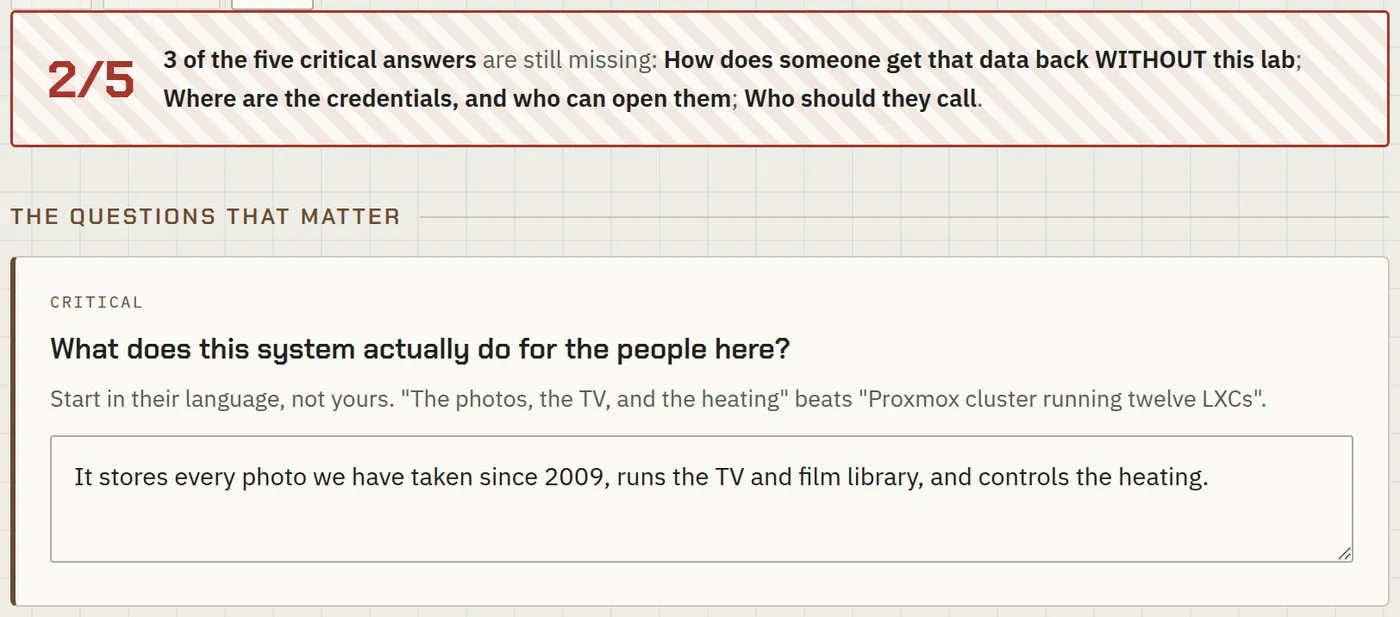
If you were unavailable for a month — or permanently — could the people you live with get their photos back, keep the heating on, and know what’s safe to switch off? The bus factor tool asks nine questions and hands you a letter written for someone who has never used a terminal.
It never asks for a password. It asks where the credentials are and who’s allowed to open them, which is the version of that answer that’s safe to print and put in a drawer. And it’s deliberately unflinching about the question most of us can’t answer: how does someone get the data back without the lab? If the only path runs through hardware in your house and knowledge in your head, the letter says so in plain words rather than pretending otherwise.
What it costs and what it needs
Nothing, and not much. There are no accounts, no cookies, and no analytics on the tool pages — I keep the site’s tracking off them deliberately. In the interest of not overclaiming: they do fetch their typeface from Google Fonts, which is a third-party request like any other webfont, and it is the only one they make. Seven are single HTML files — save the page and they keep working offline. Four need a model behind them, and you choose which: a Claude account, an API key for a provider you already use, or a model running on your own hardware. If you paste a key it stays in your browser, never lands in your lab profile, and goes only to the provider you picked.
Every one of them is also published as a public artifact you can fork, including the prompts behind the AI ones. If a tool is nearly right for your lab but not quite, take it and change it — that’s what they’re there for. They’re all listed, grouped, and linked at peira.dev/tools. If you’d rather see the workshop floor — the constraints, the three design iterations, and the bugs that got past me — that’s how they were built.
Every one of these is a model of your lab, and a model is always simpler than the thing. The failure simulator assumes shared storage; the power-loss estimate is arithmetic, not a measurement; the AI tools are a well-briefed second opinion, not an authority. Use them to find the question you should be asking, then go and verify the answer on your actual hardware. The only real backup test is a restore, and the only real UPS test is pulling the plug.
Related posts:
- Point the Tools at Any Model — the four thinking tools now run against your own provider or a model you host, and why a website can’t reach your Ollama.
- Capacity Planning for Node Failure — the arithmetic behind the node failure simulator, worked through by hand.
- Measuring Restore Time, Not Guessing It — the measured version of what the backup planner nags you about.
- Safe Shutdown with NUT and a UPS — the full build behind the power-loss playbook.
- Tailscale Subnet Router — the setup whose three-layer failure mode became the network diagnostic.
- Your First Docker Compose Stack — the starting point the compose reviewer is designed to check.
- Homelab Hardware Guide — what to buy once the sizing calculator has told you the shape of it.
- What Is a Homelab? — start here if this is all new.
Comments
Comments are powered by GitHub Discussions — sign in with a GitHub account to join the conversation.